
According to the State of JavaScript 2019, React, React Native and Redux can be found in the top three of most used frameworks, in their respective categories. I thought the timing is right to learn more about these frameworks, and thus improving my knowledge in JavaScript and its ecosystem.
I recommend going through React's and Redux's official documentation and following the "getting started" tutorials to get acquainted with the frameworks.
Creating a new React Native project
In this article we will be creating a simple counter application. First, make sure you have react-native installed. I decided to install its CLI globally.
npm install -g react-nativeLet's create a new React Native project using its CLI. I'm using TypeScript, so I have to specify the a template. You may use JavaScript if you wish, but please notice that file extensions and some code syntax may differ.
react-native init MyCounter

# To use TypeScript:
react-native init MyCounter --template [email protected]
It will download the starter template, and install its dependencies. After that, you'll notice you have a file called App.tsx - this will be your application's entry point. For arrangement purposes, I created a src folder for the source code in the root of the project and moved App.tsx there, and consequently updated the import inside index.js.
import App from './src/App';Adding React Navigation to the app
React Navigation is born from the React Native community's need for an extensible yet easy-to-use navigation solution written entirely in JavaScript (so you can read and understand all of the source), on top of powerful native primitives.
- Getting started · React Navigation
Run the following command to install React Navigation. In my case, I ran into a problem - some modules couldn't be resolved. If you find that issue, install the other packages in the excerpt below.
npm install --save react-navigation react-native-gesture-handler react-navigation-stack

# If modules cannot be resolved:
npm install --save @react-native-community/masked-view react-native-safe-area-context
I created a HomeScreen.tsx file under src/screens/home/, and I will leave it empty for now.
// src/screens/home/HomeScreen.tsx
import React, { Component } from 'react';
import { StyleSheet, View } from 'react-native';

class HomeScreen extends Component {
  render() {
    return (
      <View style={styles.container}>
      </View>
    );
  }
}

const styles = StyleSheet.create({
  container: {
    flex: 1,
    justifyContent: 'center',
    alignItems: 'center'
  }
});

export default HomeScreen;
Let's get our app ready to show the home screen once it starts. For that, we create a stack navigator and an app container, and render this container as an element in App.tsx.
// src/App.tsx
import React, { Component } from 'react';
import { createAppContainer } from 'react-navigation';
import { createStackNavigator } from 'react-navigation-stack';
import HomeScreen from './screens/home/HomeScreen';
const MainNavigator = createStackNavigator({
Home: { screen: HomeScreen }
});
const Navigation = createAppContainer(MainNavigator);
export default class App extends Component {
render() {
return (
<Navigation />
);
}
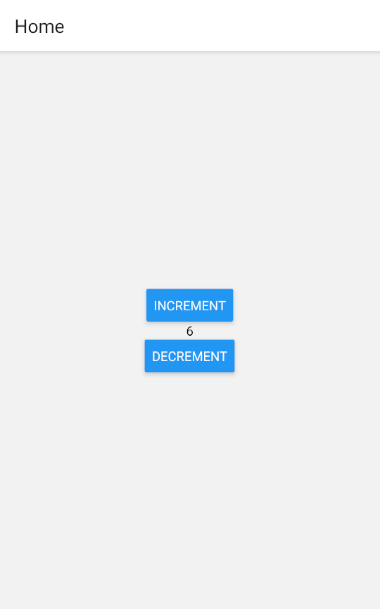
}If you run your app, it will show a blank activity with a toolbar on top that says "Home". We will add a counter to the page now, with two buttons to increment and decrement it.
// src/screens/home/HomeScreen.tsx

class HomeScreen extends Component {
  state = {
    counter: 0
  };

  increment() {
    this.setState({ counter: this.state.counter + 1 });
  }

  decrement() {
    this.setState({ counter: this.state.counter - 1 });
  }

  render() {
    const { counter } = this.state;

    return (
      <View style={styles.container}>
        <Button title="increment" onPress={() => this.increment()} />
        <Text>{counter}</Text>
        <Button title="decrement" onPress={() => this.decrement()} />
      </View>
    );
  }
}
The screen should look like this now:
Adding Redux actions and reducers
If you haven't installed Redux yet in your project, do so using the following command.
npm i --save redux react-reduxActions are JavaScript objects that represent payloads of information that send data from your application to your Redux store.
- Introduction to Using Redux in a React Native App ← Alligator.io
We'll need an action that changes the counter. So, I created a file index.ts in src/core/store/actions/ to declare my Redux actions.
// src/core/store/actions/index.ts
export const ACTION_TYPES = { COUNTER_CHANGE: 'COUNTER_CHANGE' };

export function changeCount(count) {
  return {
    payload: count,
    type: ACTION_TYPES.COUNTER_CHANGE
  };
}
In this file I've create a constant ACTION_TYPES which will hold all the action types, and a changeCount function that receives a count parameter and returns an object with a payload and an action of the type COUNTER_CHANGE.
Now for the reducer...
Areduceris a pure function that takes the previousstateand anactionas arguments and returns a new state.
- Introduction to Using Redux in a React Native App ← Alligator.io
Let's now create a file for our reducer, index.ts, inside the folder src/core/store/reducers/.
// src/core/store/reducers/index.ts
import { Reducer, combineReducers } from 'redux';
import { ACTION_TYPES } from '../actions';

const INITIAL_STATE = {
  count: 0
};

const countReducer: Reducer = (state = INITIAL_STATE, action) => {
  switch (action.type) {
    case ACTION_TYPES.COUNTER_CHANGE:
      return { ...state, count: action.payload };
    default:
      return state;
  }
};

export default combineReducers({
  count: countReducer
});
This piece of code is pretty standard. It declares a new Reducer that receives the previous state and an action, and returns a new state, in this case overwriting the count property.
Connecting Redux to the screen
Open App.tsx and edit its render method. The Navigation element will now be nested in a Provider element. This way, every page will have access to our Redux store.
// src/App.tsx
// There is code omitted, don't delete the previous changes

import { Provider } from 'react-redux';
import { createStore } from 'redux';
import countReducer from './core/store/reducers/index';

const store = createStore(countReducer);

export default class App extends Component {
  render() {
    return (
      <Provider store={store}>
        <Navigation />
      </Provider>
    );
  }
}
Next, we'll connect the home screen to the store, using two different objects. mapStateToProps will extract the data from the store to the component's properties, and mapDispatchToProps will be used to dispatch actions to the store. Moreover, we'll define the behavior of both increment and decrement buttons.
// src/screens/home/HomeScreen.tsx
import React, { Component } from 'react';
import { Button, StyleSheet, Text, View } from 'react-native';
import { connect } from 'react-redux';
import { bindActionCreators } from 'redux';
import { changeCount } from '../../core/store/actions';

class HomeScreen extends Component {
  increment() {
    let { store, actions } = this.props;
    store.count++;
    actions.changeCount(store.count);
  }

  decrement() {
    let { store, actions } = this.props;
    store.count--;
    actions.changeCount(store.count);
  }

  render() {
    const { store } = this.props;

    return (
      <View style={styles.container}>
        <Button title="increment" onPress={() => this.increment()} />
        <Text>{store.count}</Text>
        <Button title="decrement" onPress={() => this.decrement()} />
      </View>
    );
  }
}

// styles...

const mapStateToProps = state => ({
  // Change the property name to whatever you want it to be called
  // In my case, I chose 'store'
  store: state.count
});

const mapDispatchToProps = dispatch => ({
  actions: bindActionCreators(
    {
      changeCount
    },
    dispatch
  )
});

export default connect(mapStateToProps, mapDispatchToProps)(HomeScreen);
Notice that the this.props used inside the component's methods are the values obtained from mapStateToProps and mapDispatchToProps, namely the store and actions.
Final thoughts
Although simple, this app covers a lot from the React and Redux ecosystem for a beginner. There is a lot more that you can do with Redux, such as persisting your store using Redux Persist, or implement authentication to keep unauthorized users from accessing the store.